Monday, November 18, 2013

Chapter 8: Basics of Nutrition

1. A food pyramid is a recommended guideline for foods in food groups that individuals should consume daily.

2. Calories are a measure of heat units. Measures food energy for the body.

3. The three macronutrients are proteins, carbohydrates, and fats.

4. Proteins are chains of amino acid molecules used in all cell functions and body growth. 

5. Carbohydrates are compounds that break down the basic chemical sugars and supply energy for the body.

6. Fat is necessary in the diet because fat helps retain heat, produces the materials in sebaceous glands that lubricate the skin, and lipids are used by the body to make hormones, create cell membranes, and assist in absorption of fat soluble vitamins A, D, E, and K.

7. Micronutrients are vitamins or substances that have no calories and no real nutritional value, yet they are necessary for many nutrients to be properly processed by the body.

8. The fat soluble vitamins are A, D, E, & K.

9. The water soluble vitamins are B and C.

10. Vitamins A, B, and C are antioxidants.

11. Vitamin A is beneficial for the skin because it aids in the functioning and repair of skin cells, is an antioxidant that can help prevent skin cancer, and has been shown to improve the skin's elasticity.

12. The eight B vitamins are:
B complex (niacin)
B1 (thiamine)
B2 (riboflavin)
B6 (pyridoxine)
B7 (biotin)
B12 (cobalamine)
Folic acid (folacin)
B15 (pantothenic acid)

13. The minerals and trace minerals are:

Essential minerals:
Calcium
Magnesium
Phosphorus
Potassium
Sodium

Trace minerals:
Iron
Iodine
Zinc
Copper
Chromium
Fluoride
Selenium
Manganese

14. Water is essencial for the body because it sustains cell health, aids in elimination of toxins and waste, and helps regulate body temperature.

15. Vitamin C affects the skin by protecting the body from many forms of oxidation and from problems involving free radicals. It is also needed for proper repair of the skin and tissues. It fights the aging process and promotes collagen production in the dermal tissues.
 

Thursday, November 7, 2013

Pedicures

You begin a pedicure by pulling out any necessary supplies and preparing a clean and orderly area for the pedicure. 


Supplies Needed:
  • Basin
  • Soak
  • 5-6 clean towels
  • Nail clippers
  • Nail polish remover
  • Esthetic wipes
  • Nail file
  • Cuticle pusher
  • Cuticle remover
  • Nail buffer
  • Foot file
  • Sugar scrub
  • Massage lotion
  • Alcohol
  • Nail polish (including top and bottom coat)
Set-up:

First, put two warm damp towels in a towel warmer.  Second, lay out the nail clippers, nail file, cuticle pusher, foot file, buffer, and a scoop of the sugar scrub in that order from left to right on a towel.  Have a clean towel for the client under the basin, on top of the basin, and on your lap.  Have the client select a nail polish, and excuse yourself to fill up the basin with soak and very warm water (soak first, then water).  Have the client place both feet in the basin, have them check the temperature of the water, and begin nail work.

Nail Work:

Bring one foot out of the water and clip the nails to the client's desired length.  Then file the nails using long even strokes.  One direction is best, but a back and forth motion can be used to bring the nail down to the desired length.  Place the foot back in the water, and repeat on the other side. 

Bring the first foot out of the water again and rub cuticle remover on each nail and on any rough patches of skin.  Use a cuticle pusher to remove any dead skin from the nail and work the cuticle down on each toe.  Then use a buffer to work down any ridges on the nail or extra skin from the cuticle pushing.  Use the foot file to smooth out any rough skin on the heel or toes.  Place the foot back in the water, and repeat on the other side. 


Picture from www.wisegeek.com


Massage:

Remove the first foot again, and use half of the scrub on the foot, and up the leg to the knee.  Use the scrub vigorously on the heel and other tough spots, but lightly on the top of the foot and leg.  Place the foot back in the water and use the water to rinse off any excess scrub.  Repeat on the other side.

Bring both feet out of the water, remove the basin, dry both feet, and place them on the clean towel that was under the basin.  Begin to massage the foot and leg with lotion.  Begin with the leg, working hard on the muscles, and softly over the shin.  Work your way down to the foot and toes.  Don't skip out on the this part, as it is the most enjoyable part for the client.  Massage for at least a good ten minutes.  When you are finished massaging both feet, pull the warm towels out of the heater, and wrap them around the feet.  Make sure they are not too hot for the client, and compress the feet through the towels with your hands.  Let the client enjoy the warm towels while you clean up your supplies and prepare for polish.

Picture from www.beautiful-healthy-fingernails.com


Polish:

Use alcohol to completely remove all oils and products from the nail.  Paint the nails in the same order each time and do one foot with one coat, and then the other.  Paint the nails with the base coat (make sure to cover the whole nail).  Then begin with the color.  The first coat of color should be thin and slightly streaky looking.  After the second coat of color, use the top coat to work out any flaws.  Don't work the polish too much or you will start to create holes.  Use nail oil on the cuticles, and help the client get their feet into the flip flops.

Chapter 7: Basics of Electricity

1. It is important for estheticians to have a basic understanding of electricity because they use electricity to enhance their work with the skin. Electricity powers machines such as galvanic current, high frequency, and steamers.

2. A conductor is any substance that easily transmits electricity. An insulator is a substance that does not easily transmitted electricity.

3. There are two types of electric current.

Direct current- A constant, even flowing current that travels in one direction only. This includes flashlights, cell phones, and cordless electric drills.

Alternating current- A rapid and interrupted current, flowing first in one direction and then in the opposite direction. Used in hairdryers and curling irons.

4.  Volt: unit that measures pressure or force that pushes the flow of electrons forward through a conductor.
Amp: unit that measures the amount of an electric current (quantity of electrons flowing through a conductor).
Ohm: unit that measures the resistance of an electric current.
Watt: measurement of how much electric energy is being used in one second.

5. You should always look for the UL symbol on electrical devices because Underwriter's Laboratory certifies the safety of electrical appliances.

6. The four main modalities used in esthetics are 

Galvanic- a constant and direct current, having a positive and negative pole, which produces chemical changes when it passes through tissues and fluids of the body.
Faradic- an alternating and interrupted current that produces a mechanical reaction without a chemical effect.
Sinusoidal- alternating current that produces mechanical contractions that tone the muscles.
Tesla high-frequency- a thermal or heat-producing current with a high rate of oscillation or vibration. 

7. In galvanic current, the effects of the poles are as follows:

Positive- produces acidic reactions, closes the pores, soothes the nerves, decreases blood supply, contracts blood vessels, hardens and firms tissues.
Negative- produces alkaline reactions, open the pores, stimulates and irritates the nerves, increases blood supply, expands blood vessels, softens tissues.

8.  Iontophoresis: The process of introducing water-soluble products into the skin with the use of electric current.

Desincrustation: A process which uses the negative pole to soften and emulsify grease deposits and blackheads in the hair follicles.

9. Some benefits of Tesla high-frequency current are:

  • Stimulates blood circulation
  • Improves glandular activity
  • Increases elimination and absorption
  • Increases metabolism
  • Improves germicidal action
  • Relieves congestion

10. Electromagnetic radiation is energy in the form of electromagnetic waves. Also called radiant energy because it carries, or radiates, energy through space on waves.

Visible light is the primary source of light used in facial and scalp treatments.

11. The five main types of light therapy are:
 
Ultraviolet- used to increase the elimination of waste products, improve the flow of blood and lymph, germicidal and antibacterial effect, produce vitamin D in the skin, and can be used to treat rickets, psoriasis, and acne.
Infrared- used to heat and relax the skin, dilate blood vessels and increase circulation, produce chemical changes, increase metabolism, increase production of perspiration and oil, deep penetration to relieve pain and sore muscles, and soothe nerves.
White light- used to relieve pain in the back of the neck and shoulders, produce some chemical and germicidal effects, and relax muscles.
Blue light- soothes nerves, improves acne, improves skin tone, provides some chemical and germicidal effects, used for mild cases of skin eruptions, produces little heat.
Red light- improves dry, scaly, and wrinkled skin, increases rate of collagen building, relaxes muscles, penetrates the deepest, and produces the most heat.

12. Exposure to ultraviolet rays must be carefully monitored because over exposure can cause skin damage, premature aging, and skin cancer.

13. The acronym laser stands for light amplification stimulation emission of radiation.

Chapter 6: Chemistry


1. Chemistry is the science that deals with the composition, structures, and properties of matter and with how matter changes under different conditions.

2. Organic chemistry is the study of substances that contain carbon and are or once were alive. Inorganic deals with compounds that don't contain a carbon and have never been alive.

3. Matter is any substance that occupies space and has mass (weight).

4. The differences between solids, liquids, and gases deals with the size and shape.  Solids have a definite size and shape; liquids have a definite size but not shape; and gases don't have a definite size or shape.

5.  An element is the simplest form of matter;  cannot be broken down into a simpler substance without loss of identity.

6.  Atoms are the smallest particles of an element that still remain the properties of that element.

7. A molecule is a chemical combination of two or more atoms.

8. A compound is a chemical combination, whereas a mixture is a physical one.

9. Physical properties are those characteristics that can be determined without a chemical reaction and that do not cause a chemical change in the identity of the substance.  Ie: color, odor, melting point, etc. Chemical properties are determined only with a chemical reaction that caused a chemical change in the identity of the substance.

10. Matter can be changed physically or chemically. 

Physical change is a change in the form or physical properties without forming a new substance. An example is when solid ice melts into liquid water.

Chemical change is a change in the chemical composition of a substance, in which a new substance or substances are formed. An example is iron into rust.

11. Hydrogen is a colorless, odorless, tasteless gas and is the lightest element known. Elemental hydrogen is flammable and explosive when mixed with air.

Oxygen is the most abundant element found on earth. It is a colorless, odorless, tasteless gas.

Nitrogen is a colorless, gaseous element. It makes up about 4/5 of the air in our atmosphere and is found chiefly in the form of ammonia and nitrates.

12. Water is important for skincare because it replenishes moisture on the surface of the skin, helps keep other ingredients in solution, and helps spread products across the skin.

13. pH (potential hydrogen) is a substance's relative degree of acidity or alkalinity and is measured on a scale of 0 to 14. It is important to know the pH of the product you are working with because extreme variations in pH can damage the skin's barrier function and cause irritation or burns.

14. Oxidation is a chemical reaction that combines a substance with oxygen to produce and oxide.

Reduction is the loss of oxygen from a substance.

15. Solutions are uniform mixtures of two or more mutually mix able substances. They contain particles not visible to the naked eye and are usually transparent. 

Suspensions contain particles visible to the naked eye and are not usually transparent. They usually separate over time. 

Emulsions are suspensions of an unstable mixture of two or more immiscible substances united with the aid of an emulsifier.   Although they may separate over time, properly formulated and stored emulsions should last at least 3 years.

16. Oil-in-water emulsions have droplets of oil surrounded by surfactants with their tails pointing in and heads pointing out.

Water-in-oil emulsions have droplets of water surrounded by surfactants with their heads pointing in and their tails pointing out.


Chapter 5: General Anatomy and Physiology

1.  Anatomy: the study of the structure of the body that can be seen with the naked eye and what it is made up of; The science of the structure of organisms or of their parts.

Physiology: study of the functions or activities performed by the body's structures.

Histology: study of the structure and composition of tissue.

2.  Understanding anatomy, physiology, and histology is important for estheticians so they can develop their skills and perform their work safely.

3. The basic structures of the cell are:

The nucleus: the center of a cell. It holds the DNA and proteins.
The cytoplasm: watery fluid that contains the food material necessary for cell growth, reproduction, and self repair.
The cell membrane: encloses the protoplasm and permits soluble substances to enter and leave the cell.

4. Cell metabolism is a chemical process that takes place in living organisms. Through metabolism, the cells are nourished and carry out their activities

5.  The four types of tissue in the body are:

Connective tissue: supports, protects, and binds together other tissues of the body. I.e.: bone, cartilage, and ligaments.
Epithelial tissue: is a protective covering on body surfaces; for example, skin.
Muscular tissue: contracts and moves the various parts of the body.
Nerve tissue: carries messages to and from the brain and controls and coordinates all bodily functions. Nerve tissue is composed of special cells known as neurons.

6.  Organs are groups of tissues designed to perform a specific function.

7.  The most important organs in the body are:

Brain: controls the body.
Eyes: control vision.
Heart: circulates the blood.
Kidneys: excrete water and waste products.
Lungs: supply oxygen to the blood.
Liver: removes toxic products of digestion.
Skin: forms external protective covering of the body.
Stomach and intestines: digest food.

8.  The 11 main body systems are:

Circulatory: controls the steady circulation of blood through the body by means of the heart and blood vessels.
Digestive: changes food into nutrients and wastes.
Endocrine: affects the growth, development, sexual activities, and health of the entire body.
Excretory: purifies the body by the elimination of waste matter.
Integumentary: serves as a protective covering and helps the body in regulating the body's temperature. Consists of skin, accessory organs such as oil sweat glands, sensory receptors, hair, and nails.
Muscular: covers, shapes, and supports the skeleton tissue. Also contracts and moves various parts of the body.
Nervous: controls and coordinates all other systems and makes them work harmoniously and efficiently.
Reproductive: responsible for processes by which plants and animals produce offspring.
Respiratory: enables breathing, supplying the body with oxygen, and eliminating carbon dioxide as a waste product.
Skeletal: physical foundation of the body.
Lymphatic or immune: protects the body from disease by developing immunities and destroying disease-causing microorganisms.

9.  The primary functions of the skeletal system are to:

  • Give shape and support to the body.
  • Protect various internal structures and organs.
  • Serves as attachments for muscles and act as levers to produce body movement.
  • Help produce both white and red blood cells.
  • Store most of the body's calcium supply as well as phosphorus, magnesium, sodium.

10.  The three types of muscle tissue found in the body are:

Striated muscles: skeletal or voluntary muscles that are attached to the bones and make up a large percentage of body mass.
Non-striated muscles: involuntary, visceral, or smooth muscles. Function automatically without conscious will. These muscles are found in the digestive and circulatory systems.
Cardiac muscle: the involuntary muscle that makes up the heart.

11.  The three types of nerves found in the body are:

Sensory or afferent nerves: carry impulses or messages from the sense organs to the brain. Where sensations of touch, cold, heat, sight, hearing, taste, smell, pain, and pressure are experienced.
Motor or efferent nerves: carry impulses from the brain to the muscles. The transmitted impulses produce movement.
Mixed nerves: contain both sensory and motor fibers and have the ability to send and receive messages.

12.  The three types of blood vessels found in the body are:

Arteries: are thick-walled, muscular, flexible tubes that carry oxygenated blood away from the heart to the capillaries.
Capillaries: are minute, thin-walled blood vessels that connect the smallest arteries to the veins. They bring nutrients to the cells and carry away waste materials.
Veins: are thin-walled blood vessels that are less elastic than arteries. They carry blood containing waste products from the various capillaries back to the heart.

13.  The components of blood are:

Red blood cells: produced in the red bone marrow. They contain hemoglobin, a complex iron protein that gives the blood its bright red color. The function of red blood cells is to carry oxygen to the body cells.
White blood cells: perform the function of destroying disease causing germs.
Platelets: contribute to the blood clotting process, which stops bleeding.
Plasma: the fluid part of the blood in which the red and white blood cells and platelets flow. It is about 90% water and contains proteins, sugars, and oxygen. The main function of plasma is to carry food and secretions to the cells and to take carbon dioxide away from the cells.

14.  The two types of glands that make up the endocrine system are:

Exocrine glands or duct: sweat and oil glands of the skin be long to this group.
Endocrine glands or ductless: release secretions called hormones directly into the bloodstream.

15.  The organs in the excretory system are:

Kidneys: excrete urine.
Liver: discharges bile.
Skin: eliminates perspiration.
Large intestine: eliminates decomposed and undigested food.
Lungs: exhale carbon dioxide.

Monday, September 30, 2013

Lash Extensions


Lash Extensions are great way to give eyelashes volume, length, and a smooth curl.  They are also perfect for someone who just doesn't want to do their makeup each morning.  The process of lash extensions involves gluing a synthetic, curved lash to each individual natural lash.  As the natural lashes go through their regular shedding cycle, the synthetic lashes shed with the natural lash to which they are glued.  Every 2-4 weeks (depending on a person's lash cycle) more lashes will need to be added to keep the lashes full.

Supplies needed:
  • 2 Pairs of tweezers
  • Lint free eye patches
  • Lash primer
  • Lash brush
  • One of the following types of Glue
    • U+  - Quick dry time Acrylic-Based
    • B    - Medium dry time Acrylic-Based
    • A    - Slow dry time Acrylic-Based (usually used in training)
    • Q-1 - Medium dry time Latex-Based
  • Synthetic lashes ranging from sizes 7-15mm with one of the following curls:
    • J- Straighter lash used for severely hooded eyes.
    • B- Curls like a natural lash, used for recessed hooded eyes.
    • C- Most typical. Looks like a curled lash.
    • D- Most curly.  Only to be used on naturally curly lashes.
Always use Primer and sterile tools!

http://www.buykorea21.com/productImage/img20110928154440.jpg


You will first discuss with the client what her objectives are.  What look is she going for and why is she getting lash extensions.  You will also look at the client's lashes to see how full, curly, etc they are.  A plan should be made by taking into consideration both what the client wants, and what is possible with her natural lashes.  If she has very straight lashes, an extremely curly lash will not adhere well to her natural lashes.  If she has extremely short lashes, a 15 mm lash would put a lot of weight on the lash and possibly cause the lashes to shed quicker than normal.  Come up with a realistic shape that is acceptable for the client, and then have the client lay down with her head close to you and her chin up.


http://www.beautyhows.com/wp-content/uploads/2013/03/Eyelash-Extensions-Lifespan-Pros-Cons-and-After-Care-and-How-to-Remove-Lash-Extensions.jpg


Carefully place an eye patch under each eye to cover the bottom lashes.  Use tape to anchor pads in place or to cover any exposed bottom lashes.  Use primer to thoroughly cleanse any impurities and remove any product from the lashes.  Pour a small amount of glue on a sterile surface and pull out the sizes of lashes that will be used. 

With one set of tweezers, you will carefully separate the lashes and isolate one lash between your open tweezers.  With the other set of tweezers, you will grab one synthetic lash by the tip, and lightly dip the root in the glue.  Only a small amount of glue is needed.  Rub the bead of glue found on the root of the synthetic lash along the isolated natural lash to create a smooth and tacky surface for the lash to adhere.  Then place the synthetic lash onto the natural lash and hold until the glue is dry enough to hold the lash on its own.  The lash should be placed as close to the eyelid as possible, but with a little space to allow movement. 

Alternate sides to allow glue to dry well.  Also alternate the sizes you use to create a more natural looking lash.  For example, if you are primarily using a 12mm lash, add a few 11mm lashes to create a natural looking blend.  Shorter lashes are ideal for the inside corners near the nose so that the lashes don't poke the eyelid or put too much weight on the short lashes.

When each lash has been properly glued and aligned, check to make sure no lashes are sticking together or to the pad.  If two lashes are glued together, one will begin to tug on the other as they grow and will cause pain or other more serious problems.  Once you have checked to make sure the lashes are separated and straight, remove the pads and have the client sit up and THEN open their eyes slowly.


Instruct the client on proper care and maintenance of her lashes, and set up an appointment for a fill if possible. Your client will now enjoy full, long and beautiful lashes, without the hassle of mascara and curlers!

Friday, September 27, 2013

Chapter 4: Infection Control

1.  MSDS stands for Material Safety Data Sheet.  It is information compiled by the manufacturer about its product.  It includes ingredients and storage requirements.

2.  Bacteria are one-celled microorganisms with both plant and animal characteristics; also known as microbes.

3.  The two main classifications of bacteria are nonpathogenic and pathogenic. 

Nonpathogenic bacteria do not cause disease (they help the body breakdown food and protect against infection). 
Pathogenic bacteria may cause disease or infection when they invade the body.

4.  The three forms of pathogenic bacteria are:
  1. Cocci are round-shaped bacteria that appear either singly or in groups (Staphylococci, Streptococci, and Diplococci)
  2. Bacilli are short, rod-shaped bacteria.  They are the most common bacteria and produce diseases such as tetanus, typhoid fever, etc.
  3. Spirilla are spiral or corkscrew-shaped bacteria.
5.  Viruses are different from bacteria because they may only live by penetrating cells and becoming part of them, whereas bacteria may live on their own.

6.  AIDS affects the body by breaking down the immune system.  HIV is spread through blood and other body fluids such as semen and vaginal secretions.  It is not spread by holding hands, kissing, sharing food, or sitting on toilet seats.

7.  A contagious or communicable disease is a disease that is spread or transmitted by contact.

8.  The difference between local and general infection is that a local infection is confined to a particular part of the body, and a general infection is carried in the bloodstream to all parts of the body.

9.  Immunity is the ability of the body to resist disease and prevent infection. 
Natural Immunity is an inherited resistance to disease. 
Acquired immunity is developed after the body overcomes a disease, or through inoculation (such as vaccination).

10.  Decontamination is the removal of pathogens and other substances from tools and surfaces.  The three levels are:
  1. Sanitation- to significantly reduce the number of pathogens or disease-producing organisms found on a surface.
  2. Disinfection- to kill most microorganisms on hard, nonporous surfaces.
  3. Sterilization- to kill all microorganisms, including bacterial.
11.  Three types of disinfectants are:
  1. Quaternary ammonium compounds (quats)- non-toxic, odorless, and fast acting used to disinfect implements usually in 10-15 min.
  2. Phenol- caustic poison that can be safe and effective in disinfecting implements.  It may soften or discolor most rubber and plastic.
  3. Ethyl and Isopropyl alcohol- The strength must be 70% or higher for Ethyl, and at least 99% for alcohol.  Not always legal.
12.  These items may be disinfected in the following ways:
  1. Nonporous implements- Put on gloves and goggles, mix disinfectant (according to directions and adding disinfectant to the water), pre-clean with soap and water, rinse thoroughly and pat dry with clean towel, completely immerse, leave for required time, remove with clean tongs, rinse thoroughly and dry.
  2. Linens- Store in a closed, lined receptacle and wash with bleach.
  3. Electrical tools that cannot be immersed- wipe or spray with an EPA-registered, hospital-grade disinfectant created especially for electrical equipment.
  4. Work surfaces- Before and after performing services on each client, an EPA-registered, hospital-grade disinfectant should be used and left on for directed time.
13.  Six precautions to follow when using disinfectants include:
  1. Always follow manufacturer's recommendations for mixing and using.
  2. Always wear gloves and safety glasses when mixing chemicals with water.
  3. Always add disinfectant to water, not water to disinfectant.
  4. Use tongs, gloves, or a draining basket to remove implements.
  5. Never pour quats, phenol, alcohol, or any other disinfectant over your hands.
  6. Never place any disinfectant or other product in an unmarked container.
14.  To take care of an exposure incident:
  1. Stop the service
  2. Wear gloves
  3. Clean the injured area with an antiseptic
  4. Bandage the cut with an adhesive bandage
  5. Clean your workstation
  6. Discard contaminated objects by double-bagging and using a biohazard sticker
  7. Disinfect tools and implements
  8. Remove your gloves, and wash hands
15.  Universal Precautions are a set of guidelines and controls, published by OSHA, that require the employer and the employee to assume that all human blood and specified human body fluids are infectious for HIV, hepatitis B virus, and other bloodborne pathogens.

Friday, September 13, 2013

Chapter 3: Communicating for Success

1.  The Golden Rules of human relations are:
  • Communicate from your heart; solve problems from your head.
  • A smile is worth a million times more than a sneer.
  • Be kind to others. Treat people in a way that allows them to maintain their dignity.
  • Every action brings about a reaction.
  • Learn to ask for help when you are overwhelmed.
  • Show people you care by listening to them and trying to understand their point of view.
  • Give compliments freely.  An encouraging word at the right moment brings out the best in people.
  • Being right is different from acting righteous.
  • Balance your service to others with personal time to renew your own mind, body, and spirit.
  • Laugh often.
  • Show patience with other people's flaws.
  • Take time to evaluate your own attitude and actions.
  • Make amends when you are wrong.
  • Learn to forgive yourself and others.
  • Be compassionate toward others, demonstrating your support in difficult times.
  • Build shared goals; be a team player and partner to your clients.
  • A simple thank-you goes a long way in showing your appreciation to clients and colleagues.
  • Remember that listening is the best relationship builder.
2.  Communication is the act of successfully sharing information between two people, or groups of people, so that it is effectively understood.

3.  The ten elements of successful client consultation are:
  1. Review- Review the intake form and develop rapport with you client.
  2. Assess: Assess your client's goals and objectives.
  3. Preference- Ask the client what products and services she has done and what she thinks of them. What is the reason for today's visit?
  4. Analyze- Assess the client's skin type, texture, and any skin conditions.
  5. Lifestyle- Ask your client about her career and lifestyle.
  6. Show and tell- Review the various treatment options, and then use reflective listening to make sure you and the client both know what is going to happen.
  7. Suggest- Narrow the treatment options based on lifestyle, skin type, skin conditions, and Fitzpatrick typing. Tactfully discuss any unreasonable expectations and suggest any other helpful services.
  8. Sun exposure- give instructions regarding proper skin care with every client.  Make sure to advise clients who have exfoliating treatments to keep out of the sun.
  9. Maintenance- Counsel every client on proper skin care, regular salon treatments, lifestyle limitations, and home maintenance.
  10. Repeat- Reiterate everything that you have agreed upon.
5. Record things on the client's consultation for such as the client's reactions, anything you did and want to do again, and final results.

6.   To handle tardy clients make sure you know your salon's late policy.  If you can take the client, make sure you politely let them know that it is not acceptable to be late, but you can help them this time. If a client is habitually late, tell them an earlier time to come.

7.  To handle a scheduling mix-up make sure to be polite and don't argue about who is correct.Make another appointment for the client for as soon as possible.

8. To handle an unhappy client, first find out why the client is unhappy, then make an appointment to fix the problem as soon as possible.  If it is not possible to fix the problem, you may have to defer to the salon manager.

9. When communicating with Coworkers, it is important to remember:
  • Treat everyone with respect
  • Remain objective and neutral
  • Be honest and sensitive
  • Keep your private life private
  • Do not take things personally
10.  When communicating with a Salon Manager, it is important to remember:
  • Be a problem solver
  • Get your facts straight
  • Be open and honest
  • Do not gossip or complain about coworkers
  • Check your attitude
  • Be open to constructive criticism

Friday, August 30, 2013

Chapter 2: Professional Image

1.  Professional Image is "the impression projected by a person engaged in any profession, consisting of outward appearance and conduct exhibited in the workplace."

2.  Balance is an essential component of health because it is what allows you to promote and maintain health.  It creates a healthy lifestyle, which in turn allows you to make the best decisions concerning your health.

3.  Basic habits of personal hygiene include: Showering daily, keeping hair fresh, regular skin care, brushing and flossing, using breath fresheners as needed, using deodorant, washing hands as needed, being selective about wearing fragrances, and keeping nails trimmed and clean.

4.  Good posture helps you look good and feel good.  It also helps prevent some physical problems and promotes energy.

5.  Characteristics of a healthy positive attitude include:  Diplomacy, emotional stability, receptivity, sensitivity, values & goals, communication skills, discretion & confidentiality, and maintaining boundaries.

6.  You can develop a strong work ethic by being thoughtful about how you approach each day, how you treat others, and how you support your employer's needs.

7.  It is important to be a team player because it creates a work environment where everyone can be successful.

8.  The best way to deal with an unhappy client  is to view the situation as an opportunity to develop communication skills.  Some coping techniques include:  Counting to 10 and thinking before speaking, directing the situation to a higher authority if needed, and avoiding criticism.

9.  Managing your time is important because it allows enough time to maintain a balanced healthy life, and because it is a major component of being professional.

10.  Six ways to practice ethical behavior include: obtaining necessary credentials, maintaining integrity, knowing your boundaries, keeping client relationships professionally friendly, being honest & truthful, and being open to seeking consultation from more experienced people.

11.  Ten life skills that can lead to success are: build self-esteem, visualize your success, build on your strengths, be kind to yourself, define success for yourself, practice new behaviors, keep your personal life separate from work, keep your energy up, respect others, and stay productive.

12.  Setting goals is important to success because it maps out the journey to your success.  Without goals you are just floating. 

13.  Some ways to manage your time include learning to prioritize, never taking on more than you can handle, using problem-solving techniques, planning dates with family & friends, and developing your own personal mission statement.

Tuesday, August 27, 2013

Galvanic Desincrustation


I have heard a bit about Galvanic Desincrustation and I wanted to know more so I watched this video http://www.youtube.com/watch?v=Xyu4vN3wrHY.  I enjoyed this explanation because it was easy to understand, but it also gave detailed information about the science behind the procedure.


When used on the negative polarity, galvanic current is used to soften sebum and dilate follicles in order to make extraction easier.  First, you attach the passive electrode to the client.  In this video, she places it under the client's back.  Make sure it is totally covered in a moist sponge in order to have good contact with the skin.  Inform the client that they may experience a warming/tingling sensation and a metallic taste in their mouth.  Cover the tweezers entirely in cotton soaked in desincrustation solution. Next, spread the same solution on the face.  If you are doing the ears, place cotton balls soaked in the solution inside the ears.  Place the electrode on the skin, and THEN turn up the current.  Keep the tweezers electrode constantly moving, and don't let it lose contact with the skin. The total face should be covered in about 3-4 minutes.

ASCP Insurance Webinar

Since starting this apprenticeship, I have been interested in getting insurance but didn't know where to even begin.  After watching this webinar http://www.ascpskincare.com/resources/webinars.php I felt much more educated about insurance and more prepared to make a selection.


In this webinar, Jesse Cormier gives many examples of why every esthetician should look into insurance.  The stories that stood out the most to me were the stories about waxing accidents.  I plan on doing a fair amount of waxing, and from the many accident stories she told, it sounds like serious waxing accidents can happen easily and quickly.  Many of her stories and examples had to do with estheticians who were doing everything correctly and encountered a unfortunate accident.  This further persuaded me that I need to make sure I am covered for any occurrence.

This webinar was also very helpful because it outlines some of the important things to look for when looking into insurance.  One particular thing that was new and good information for me was in regards to Claims Made vs Occurrence Form.  Claims Made only covers you if you are insured by them when a claim is made.  This means that if there is a lapse in your policy, or if you aren't working and decided to not renew your policy, if is a claim is made you are not covered.  Since many claims are made much later than the actual incident, this is a big risk.  I learned that I will always look for Occurrence Form insurance.


Monday, August 26, 2013

Chapter 1: History and Career Opportunities

1.  Kohl, berries, tree bark, minerals, insects, and herbs are some of the materials used by ancient people as color pigments in cosmetics.

2.  Ancient Hebrews used olive and grape seed oils to keep their skin healthy and moist.

3.  The word cosmetics comes from the Greek word Kosmetikos meaning "skilled in the use of cosmetics.

4.  Steam therapy, body scrubs, and massage were body rituals provided by ancient Roman bath-houses.

5.  Women in the Victorian Age used facial masks made from honey, eggs, mil, oatmeal, fruits, and vegetables.

6.  Retin-A, Botox, and alpha hydroxy acid were introduced in the late 20th century.

7.  Some career options available to estheticians in salons and day spas include: Performing facials, facial massage, waxing, body treatments, and doing makeup.  Estheticians can also make their way up to management & supervisory positions, or open/buy their own salon.

8.  Medical aesthetics includes both surgical procedures & esthetic treatments.  They can assist physicians by doing things such as patient education, marketing, buying and selling products, camouflage makeup, and some advanced treatments such as light and laser therapies.

9.  Makeup artists can be employed with photographers as assistants, doing makeup on models,  or doing makeup for film, movies and theater.  They can also do camouflage therapy or work in a mortuary setting.

10.  A manufacturer;s representative demonstrates how to use products to people in settings such as a salon or drugstore.  A cosmetics buyer keeps up with new trends and keeps records of what a store needs, buys, and sells.

11.  An esthetics educator can teach in a variety of schools, direct or own a school, or be a product education director for a company.

12.  The twentieth century brought about products and procedures that brought a lot of attention to skin care.  In the 21st century, nanotechnology made the future opportunities in skin care endless.  As people live longer, and more stress and demands are placed on our bodies, the need for esthetiticans will continue to increase.

Meet Sandy Zibetti


My name is Sandy Zibetti, and I am a Stay-at-Home Mom of two.  I have been married almost 5 years, and I have a 2 1/2 year old girl named Zoe, and a 7 month old boy named Zander.  I received my Bachelors degree from BYU in Humanities with an emphasis in Art History.  I absolutely love being a mom and I am so excited to learn a new trade that will allow me to develop new skills and friendships, while still focusing most of my time on my family.

I first became interested in esthetics when I got my own eyelash extensions  just before I had my little boy.  I looked forward to the monthly fill appointment as a time to relax, enjoy good conversation, and leave feeling a little more confident in the way I looked.  Those things all meant a lot to me, and I thought it would be very fulfilling to do that for others as well! 

I am a little nervous to practice on live models because I am bit of a perfectionist and I want them to be happy with the results.  However, I am confident in Ali as an instructor and know I will be well prepared.  I am so excited for this apprenticeship, and I look forward to combining my passions of admiring & creating beauty, and uplifting & helping others in a new way!

Thursday, June 13, 2013

Eyelash tint and perm

Get some fun results for those stubborn lashes that aren't dark enough and just won't curl. Tint first (top and bottom lashes), then perm. Great for woman with light colored lashes or for woman who use a dark mascara. Also great for the woman that is constantly having to curl her lashes, get a curl that will last for weeks. No mascara needed ladies!!!

Silky Smooth Pits

I love waxing and I think under-arm (arm pits ;)) are a pretty rewarding wax. I HATTTEEEE shaving my arm pits as do most woman, am I right? It's annoying and pretty darn gross, why not get rid of it for weeks with a quick wax?
Keep in mind when doing this that the top section with grow one way and the bottom grows another this means that you will most likely need to do it in opposite directions to get all hairs with two separate strips, I know it's a bummer. Also remember that if there is any left over to then use hard wax or tweezing so you aren't going over the same area where soft wax was just placed. Now go enjoy those silky smooth pits ;)

Just a little "Man-Scaping" ;)

Women are not the only ones who can enjoy services such as waxing, tinting, or pedicures. And it is also becoming more "socially acceptable". There is no need for a man to deal with unsightly hairs, greying eyebrows, or funky feet just because they are a man. All services can be catered to men so that no one need ever know you had anything done. I also think most women would agree with me in saying it's refreshing to see a well taken care of man. :)
Here are some pics of chest waxing, a way for men to enjoy weeks of not shaving so they can look great next to you on the beach without their shirt on

Get rid of those annoying back hairs with a fast wax
"Man-scape" your brows, there's no need for a uni-brow, and it can be done very slowly with some simple waxing and trimming, without any crazy dramatic changes like this next photo
 Get rid of those grey hairs in your brows to give your face a youthful little spark again with a quick simple eyebrow tint ;)
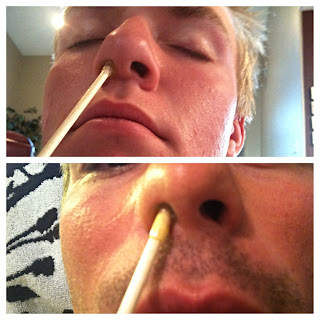
 Get rid of those annoying nose hairs with a painless, quick and fun nose wax
And finally pamper those hard workin' man feet by getting a relaxing rewarding pedicure


Shellac Nails!

I love all these colors! Can't wait to try out the new colors I just got for summer! A sparkle red and ocean blue... stay tuned ;)
To do these refer to my other post on shellac. One of these photos you will notice has glitter cascading over nail, do all steps as usual but before top coat add some glitter to bed of nail and brush over nail for desired effect then place your top coat. You may also request a different accent nail color or nail with full glitter. To do one nail or multiples with full glitter don't forget to do same steps as glitter toes (glitter after color, top coat, buff, top coat) you will want to cure just the one finger so as not to "over bake" the others. Enjoy!


Brows: Tinting and Waxing

I have loved learning how to wax and tint. It adds so much definition to the face, brightens the eyes, and makes life easier by not having to tweeze or pencil in eyebrows.


Shellac Glitter Toes

Have loved this new twist on shellac! Everyone loves glitter toes but hate what they do to their toes, it can be very damaging to the nail depending on the method at which they are placed, and sometimes need to be drilled off your toes.
When doing these follow the steps located in my other shellac blog but of course add glitter. Here's an overview and the minor changes I have made to these awesome toes.
1. Prep as usual pushing back cuticles and buffing toes, wipe with alcohol.
2. Place thin layer of base coat, cure for 30 secs
3. Place a thin color layer, if you have a shellac color that is close to the glitter color you will be using use that if not I have found that white works well with most colors because the first layer is pretty translucent, cure for 90 secs.
4. When done curing color layer place glitter over toes, brush off excess, and place top coat, cure for 120 secs
5. When done with this wipe toe off with alcohol as if you were finished, I then slightly buff toe to smooth out glitter ridges, wipe with alcohol again, and place another top coat, cure for another 120 secs.
6. You're done!!! Wipe off toe again with alcohol and enjoy your sparkly toes! These are awesome for summer and will add a beautiful za-za-zoo to your toesies! :)
Here are some pictures to enjoy! More to come.....


Friday, May 24, 2013

Shellac

I have grown to love shellac but it was hard to get there. It is definitely a difficult, touchy polish to use. I have had it bubble, shrink, overhang, and not cure correctly. If there is anything at all on nail it will bubble, if there is too much of a layer it shrinks, if there is polish touching the edges on finger it will overhang and lift, and if it isn't cured correctly it will obviously not stay and smears. But all are important to know so that you can enjoy the great benefits that shellac offers. If done correctly it will last 2+ weeks.
You will first shape the nail and push cuticles back. You then lightly buff the nail. Then you will use an esthetic wipe with alcohol on it to clean the nail. Make sure this is dry before starting application. You will then place a veryyyyy thin layer of the the base coat. Place hand in curing light and make sure thumb is flat as well so that its edge gets cured. Paint other hand. When first hand is done curing place first thin layer of color coat. Cure. Place thin second color coat layer. You will want to do as little layers as possible so it's not too thick but you still want color to be vibrant and flawless. Cure. Place thin layer of top coat. Cure. After done curing top coat you will want to buff nail with alcohol wipe again because it will feel tacky. If you wish to remove shellac simply soak fingernails in pure acetone for about 4 minutes and gently scrape off shellac, all should peel off like a sticker. Now enjoy your beautiful nails!

Nose Waxing

I have loved doing nose waxing! If you haven't done it you need to try. It's great not to have those embarrassing hairs, it instantly helps your breathing AND this wax surprisingly doesn't hurt at all!!! It is way less sensitive than any other waxing I have ever tried.
You use hard wax and create a ball on the end of the stick, don't use it when it is flowing fast you want it to have a very slow flow to it. When this happens you will place stick into nostril (be careful not to go too far, you just want outer hairs removed, the hairs higher still are useful for your bodies natural defenses) you will slightly twist stick as to coat hairs and get as many as possible. You may do both nostrils at once but this would not be ideal for clients who are claustrophobic or have breathing issues. You will want to hold stick in place until it is hardened (will still feel mildly tacky but you want to remove it before it becomes brittle). When it is hardened you will brace one hand on forehead while slightly pulling up with this same hand to steady nose, use other hand to quickly pull downward. The results will shock you! The stick will resemble a porcupine and you will be amazed with the amount of hairs that were actually in your nose ;) After you are done with both nostrils make sure you check inner nostril to make sure there is no residual wax or hairs that you missed. Enjoy the benefits of painless nose waxing now! :)

Sunday, February 17, 2013

Eyebrows

All of these clients had their eyebrows tinted then waxed! Loved learning how to do this. Tint the eyebrows first. Then clean clients eyebrows and surrounding skin, then use your prep oil and then waxing powder (this helps prevent tearing or irritation), then place thin layer of wax. Place waxing paper over and press into hairs. Grab edge pull skin tight and remove waxing strip. Place fingers over waxed area to help avoid sting. Continue with waxing after done place after oil to remove any residual wax left over. Then clean client with mild astringent.


When measuring the space between the eyebrows you should line it up with the outside of the nose, anything extra or any spare hairs in the middle should be removed. Above eyebrows can be cleaned up as well. Arch of eyebrow should start with the outside of the iris. Trim any long hair that are out of place.

Tuesday, February 12, 2013

CPR

I have been CPR certified for years through my first profession of Dental Assisting. The protocols have changed over the years but basically as long as you are doing something it is better than nothing. The class is always taught in my dental office by fireman/EMT Jason Underwood. He is hilarious and makes the class super enjoyable and fly by with his insane stories. The new protocols as of this last year are pretty simple. But it will also depend on if you are "working" someone (giving them CPR) by yourself or have help. The way you will do CPR has age limits but these of course depend on the size of person not just age. Example: you come across a 8 year old in 5 year olds body size you will treat them as a child, not adult. Also clothing must be removed to get proper CPR done, also in case patient doesn't revive and EMT's need to shock patient they will need no clothing on anyway. Yes this does mean as embarrassing as it is you will need to remove ladies bras... but better alive and embarrassed right?
If you alone find an unresponsive adult (ages 8 and older) you will first...
  1. check patient to see if they respond (try to wake them up) if they don't check for breathing (look for chest rise).
  2. Call for Help then call 911, if there is an AED machine available (shock machine) get this at this time.
  3. Check for pulse. (carotid artery, this can be found if you go to either left or right side of throat below jaw)
  4. If no pulse-START COMPRESSIONS. Using both hands intertwine hands, lock elbows, and find middle of sternum, start compressing, you want to go about 2 inches down. Press HARD and FAST. Do 30 compressions. (You may hear noises of breaking bones or calcification, keep going, having a broken bone is better than being dead.)
  5. Open Airway and give 2 breaths. Tilt head back all the way by lifting chin. You should see the chest rise. DO NOT give anyone you don't know health history of breaths without a mask. As sad as this sounds you are no good to anyone dead yourself if you contract a disease.  (Hep A, B, C, TB, and AIDS) Compressions are better than nothing so don't feel bad. (the fireman who taught our class had a friend on the force who contracted Hep from a 8 month old baby he did CPR on and died leaving his 3 young children and wife alone at the young age of 36. He figured "what could a baby have?" Patient died 5 years later from it's disease as well.) Masks are cheap and can be found online for about $20. Get one keep it in your car, purse, at home etc. 
  6. Resume compressions. Another 30. 
  7. Reassess victim after 5 cycles of this. 30 compressions/2 ventilations. If nothing use AED machine at this time, most of them now days are fool proof. Clothing must be off and kits will have instructions on how to use it. STAND CLEAR, do not touch them at ALL. It will shock you and give you a wicked charley horse.
 2 person CPR Adults
Same thing but take turns compressing and breathing. (30 compressions 2 breaths.)You don't want to tire if you don't have to.
Adult rescue breathing:
patient found with a pulse. 1 breath every 5 seconds. Reassess patient pulse every 2 minutes. Call 911.
Adult foreign Airway body obstruction (conscious patient):
  1. Ask victim if they are choking
  2. Ask victim if they can speak (if victim is coughing/speaking, they are getting air do nothing unless it stops, DO NOT leave them alone however, stay in case it becomes a full obstruction)
  3. Get behind patient
  4. Place one fist just above belly button, thumbs inward, grasp first hand w/ second hand
  5. Pull your fists inward and upward rapidly 5 times
  6. Reassess patient- repeat above steps until victim can breathe or becomes unconscious. 
Patient who becomes unconscious
  1. Carefully support patient to ground
  2. Call for Help/911
  3. Start chest compressions (no pulse check- 30 compressions)
  4. Look into mouth prior to breathing to see if you can see object obstructing airways, If you can use fingers to remove it, if not 2 breathes. 
  5. If ventilation doesn't cause chest to rise readjust head and try again. If no rise repeat compressions
Obese or pregnant women:
5 chest thrusts instead

1 person child (1-8years) CPR
Same as  adult just use one hand instead of two for compressions 30 compressions/ 2 breaths, you will want to tilt chin less than adult. 5 cycles. If no response call 911 and continue.

2 person child or infant CPR
15 compression instead and take turns, 10 cycles. Call 911.

Child airway obstruction
Same as adult but use one hand and don't push inward and upward with as much force.

1 person Infant (under 1) CPR
  1. check for unresponsiveness
  2. yell for help/911
  3. check for pulse (brachial artery, inside of arm)
  4. If no pulse start compressions, 2 fingers 30 compressions, support head with other hand on forehead
  5. open airway, don't tilt head far it closes of airways, 2 SMALL breathes (the amount of air you could fill with just cheeks puffed up, you can pop their lungs...) watch for chest rise.
  6. resume compressions
  7. reassess after 5 cycles
  8. if you haven't call 911 now!
Infant airway obstruction
5 back blows between shoulder blades, babies stomach laid length wise over forearm tucked into body palm supporting head (football hold) use other hand for blows. Follow this with 5 chest thrusts. After each cycle elevate child to see if it's breathing. 

Child and infant rescue breathing w/ pulse
1 breath every 3 seconds, reassess every 2 minutes.

Hope this helps, please feel free to ask me or call your local fire department/ EMT service with any questions or to get certified!!!! You can save someones life but hopefully you will never have to use it! :)

Monday, February 11, 2013

Manicures

Set up for Manicures
  • Hot towel
  • Soaking bowl w/ soap
  • Nail polish remover
  • Cotton
  • Finger nail clippers
  • Nail files
  • Nail buffer
  • Cuticle Pusher
  • Cuticle removing gel
  • Scrub
  • Lotion
  • Alcohol
  • Base coat polish
  • Nail polish
  • Top coat
  • Cuticle oil 
You want to have all products that you will use out before time of service. Place towel in cavi so that it is ready when needed and has time to heat. (It will be beneficial to you to soak towel in water that is already hot so that it won't take as long to heat.) While client is picking out desired nail color excuse yourself to fill soaking bowl with hot water and a tiny bit of antibacterial soap.
Ask client how they like they shape of there nails and what length they would like them to be while assessing nail condition. If clients want length off you will clip nails at this time. Then you will start to shape nails. When shaping nails you may use a back and forth motion if nails are healthy and thick. If they are more fragile you will want to use minimal strokes and only go in one direction. Try to avoid going down sides of nails to much as this can cause hang nails. If you already see hang nails present ask client if they are okay with you removing them, you will do this with your clippers.
After you have done one hand you will want to place cuticle removing gel onto cuticles (being careful not to touch cuticles with bottle as this is cross contamination). You will then place clients fingers into water, make sure to ask client if the temperature is okay. Then proceed to other hand. After you are done filing and shaping second hand you will want to switch it to water and place other hand on towel. You will then start to push cuticles back. You want enough pressure to remove cuticle that have been building up on base of nail. Do this at base of nail as well as up then sides, then clean out underneath nail. Buff nail to get any extra organic matter off nail as well as shine any scratches in nail. Repeat with other hand.
Get hand scrub and massage any rough spots, repeat to other hand. Get hot towel out of cavi and make sure temperature of towel is okay to client. Let hands sit in hot towel while gently rubbing hands, let soak on hands for a couple minutes. Remove one hand and rub scrub off it and place on top of towel after cleaned off. Repeat with other hand. Move wet towel to the side.
Get lotion and start massaging hands and arms. Make sure that the pressure feels okay to client. Work lotion into skin after it is absorbed move to other hand. Work up the arm and across it, move to wrists then hands and fingers. Don't rush this process its the most relaxing for you clients. After you are done with massage remove any lotion from nail with cotton that has alcohol on it. You may then place base coat. Do this to all ten fingers, it gives first nails time to dry so that you may move to next coat. You will then place colored polish. You will most likely need to do this multiple times to get desired color as well as fix any brush strokes you may see. You want to try to get nail covered in three strokes. After finished with color you may move to your top coat. After nails are dry you may place a cuticle oil as well as a hand toner for a fresh finish.


Sunday, February 10, 2013

Eyebrow Tinting

Loved learning how to tint! It was something that I had never actually heard of doing myself, I have always penciled in my eyebrows and loved the results tinting gave me. It is great because it picks up on the lighter hairs in your brows and makes them look fuller without having to pencil brows.
You want to start with clean brows, then mixing the tint and the developer (made of HO2O, hydrogen peroxyde) in equal amounts you start to paint onto eyebrows. You want to place tint quickly at first so that the eyebrows can start developing together, then going back you place more and work it into hairs. After you have placed tint it is a good idea to clean up any extra around brows to make sure it doesn't tint skin. You can also do a wax right after and clean up extra product this way. Depending on how dark you want hairs to go depends on how long you leave tint on. This process time is anywhere from 3 minutes to 15 minutes. After you have gotten desired color you will remove tint with wet cloth. Please let us know if you would like to try this awesome service! :)

Wednesday, January 30, 2013

Lash Perm and Tint

We are looking for three models to get their lashes permed and tinted next Wednesday at 4:30, 5:00 and 5:00pm. The service will be done for free but there will be a $5 product charge. Let me know if you are interested!

Tuesday, January 29, 2013

Lesson 1: Brow Tinting

Brow tinting is a service that everyone will love. Tinting adds color and depth to the eyebrow. It picks up the lighter hairs and helps the brow look fuller and more defined without using a pencil. Next time you get waxed, add a tint. You won't regret it.  This is Courtney's first skill. She did great. Maybe she can tint those eyelashes next time.

Motivational Speaker Continued


Everything we love, touches money. Whether or not we love money, we all need money to love us.

Everyone falls predominately under ONE category when it comes to the four "Money Types".
  1. Avoider/Dreamer -Spends, Would rather not think about the numbers, just hopes it all works out
  2. Saver/Protector - Won't spend on oneself, always saving for a rainy day, over worries 
  3. Spender/Giver - Credit Card Debt, Loves to spoil themself and others, Rationalizes
  4. Martyr/Nurturer - Can't charge for ones own services but is willing to pay for others, loves bargains
Four ways to make money fall in love with us.

Understand it.
Focus on it.
Give it order.
Give it lots of attention

Understanding your money type and how it affects your business is important to success.
For example:

  • If you are an Avoider/Dreamer, Get out of your comfort zone and look at the numbers, find a support person or goal to hold you accountable.
  • If you are a Saver/Protector, give yourself a mandatory allowance or special checking account. Spending the money you make will help you from burning out and resenting your job. Take a little pay off!
  • If you are a Spender/Giver, Get a calendar and stick to it. Maintain structure in your finances. When you have it all in order, you will make more so that you can spend more.
  • If you are a Martyr/Nurturer, be strong in not giving discounts. You are worth full price.


Focus on your income not your expenses.
Every month, take a lined piece of paper and number it for the days of the month. Each time you gain money from any source, write the amount on the line for that day. $50 here, $10 there, you will subconsciously start to fill in any of the empty lines (days of no income/revenue). You can earn money everyday, by focusing on income, we will get it.

Money does not land in chaos. Money loves order. Have a plan, be your best self and you will find yourself with endless wealth.

By applying these principals and giving money the attention it deserves, we will attract what it is that we want. Changing your "Money Voice", or voice in your head when thinking about money, will help you give the right attention to your needs and desires.

My new money voice:
"I am in control of what comes in and am smart with what goes out. I work smart to meet all of the needs of my family and business and have plenty leftover to save and share with those in need."